corrals

Design process

I recently uploaded a video describing my design process with a real project that I worked on this summer.

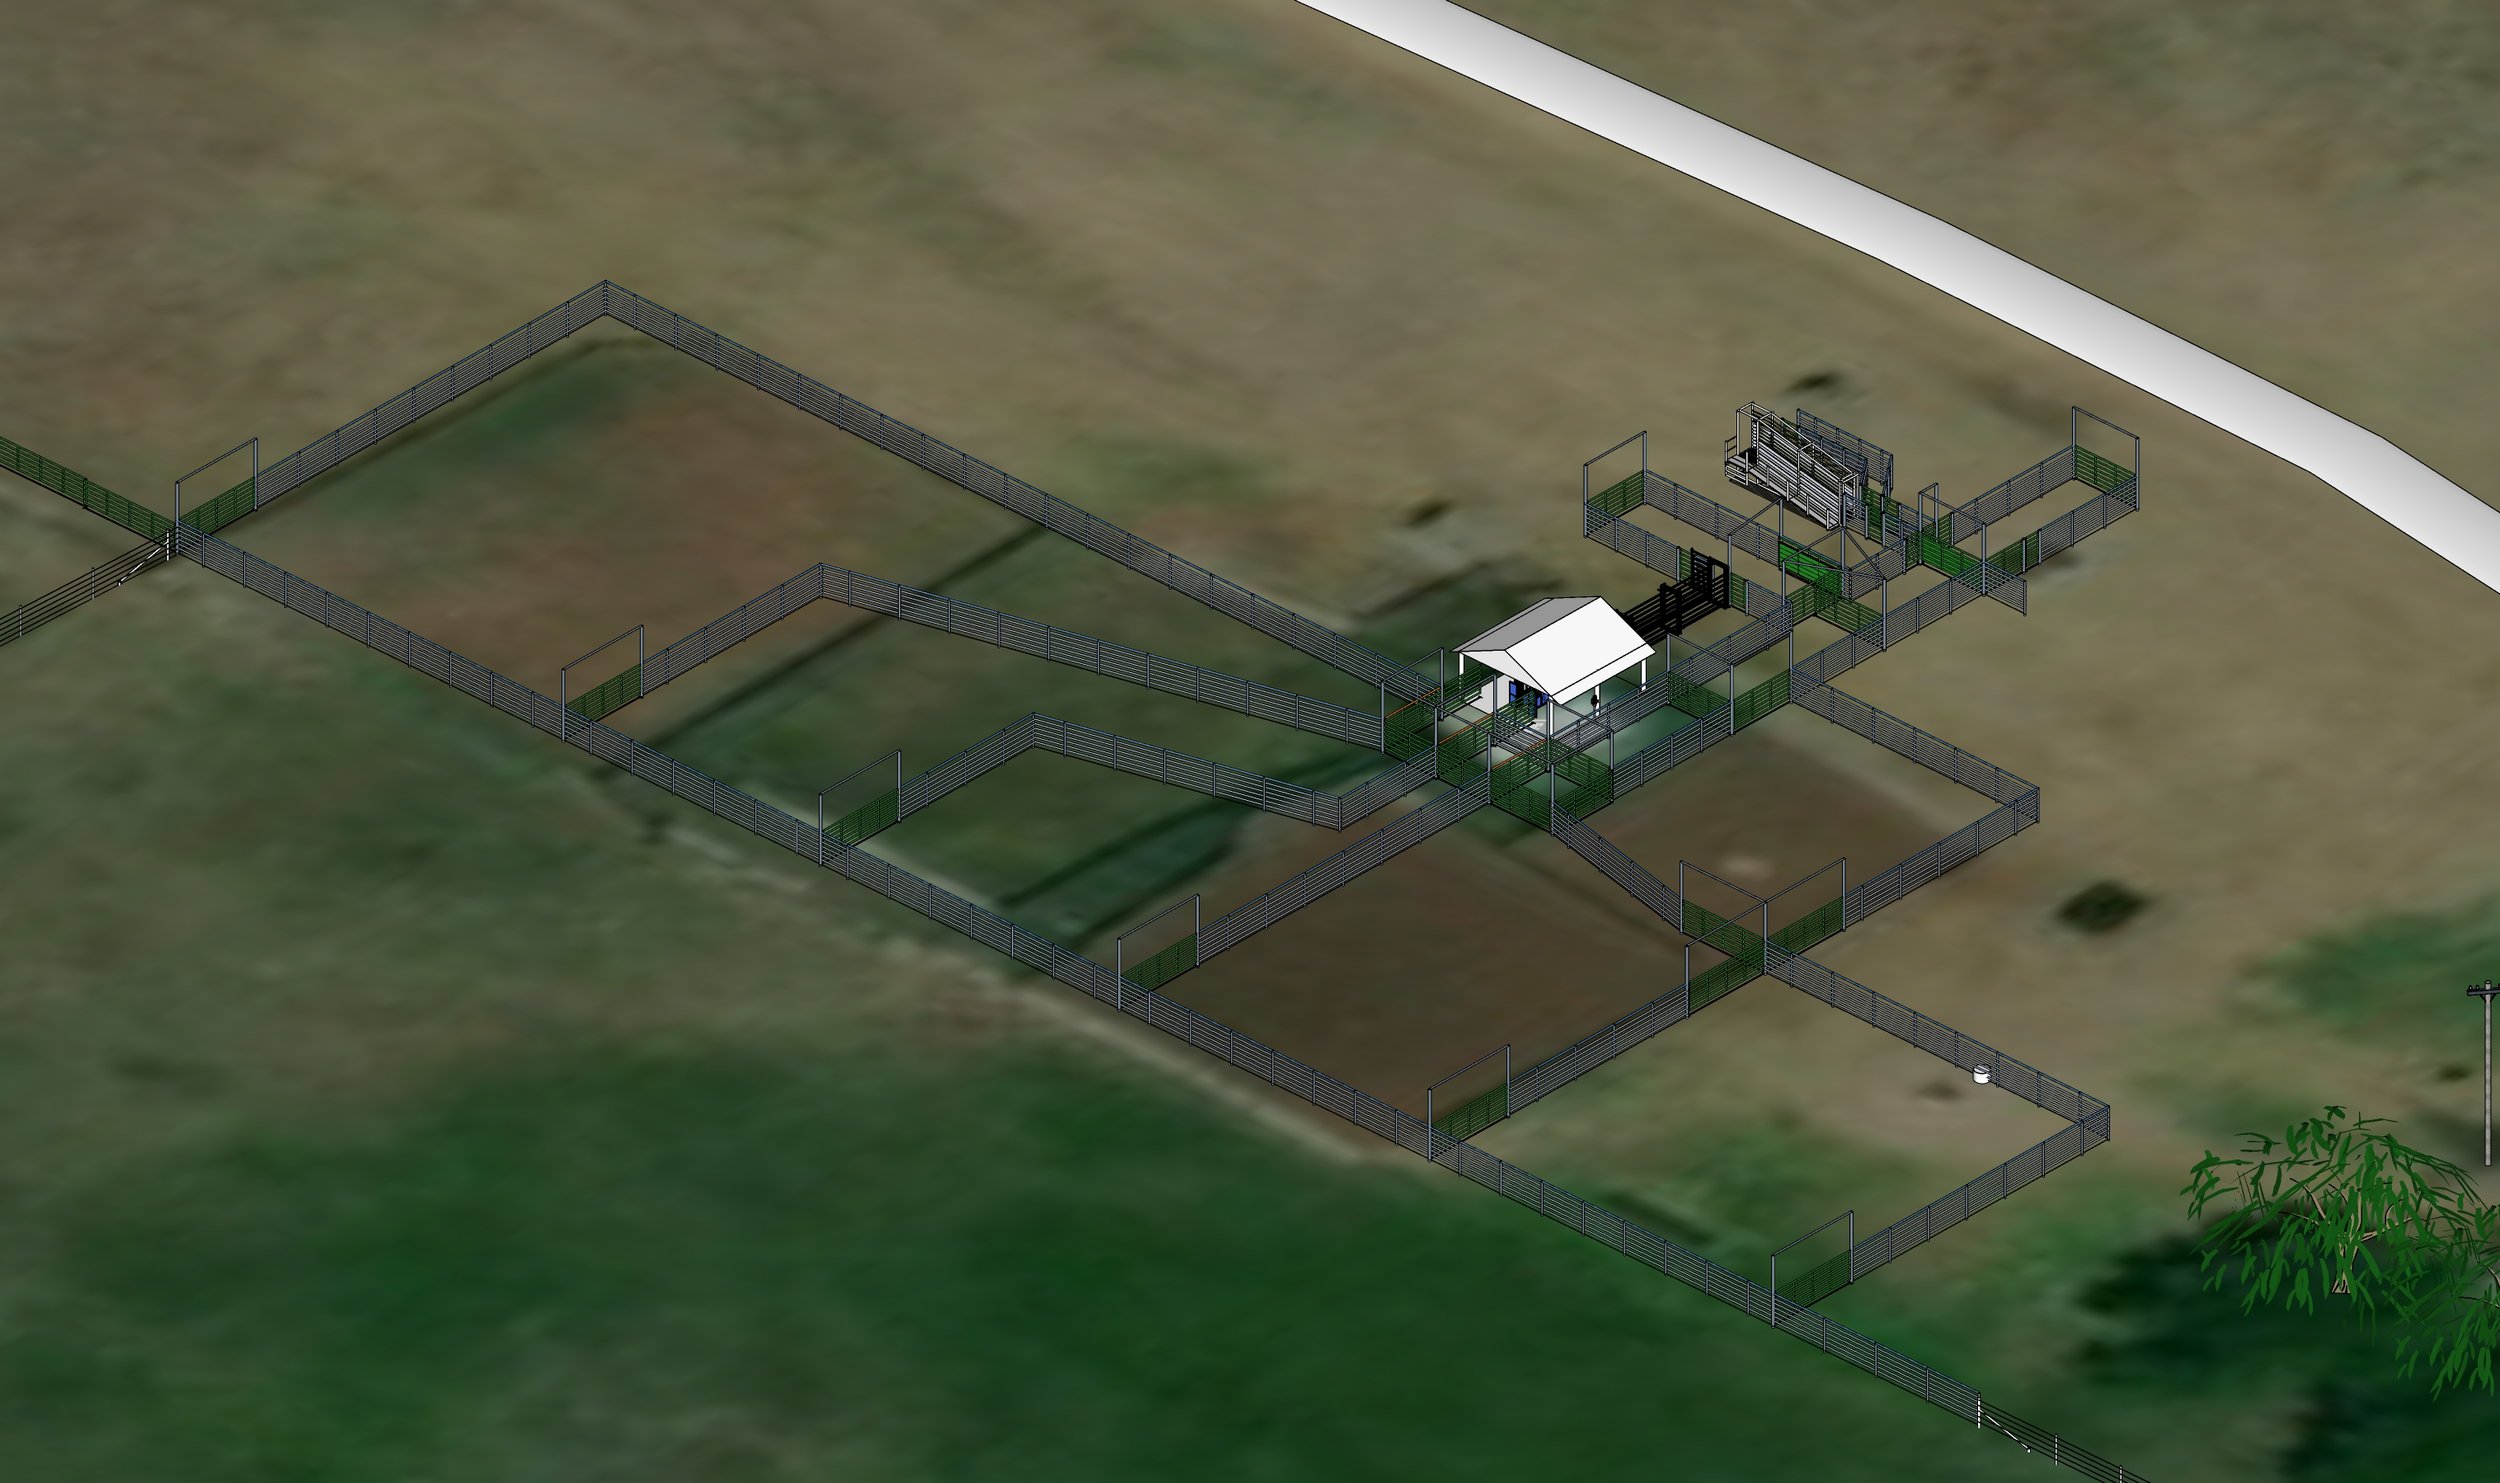
The first step in any design is to familiarize yourself with the location. Mark out the important features. In this project, we had a road that was very important because it determined which direction the trucks needed to be facing when they were loaded.

Next we had a small pole barn with a cement pad that we wanted to reuse. This is a corral that is used in summertime only, so we didn’t need a big building, and it’s a remote location, so reusing a building made sense. There was a small water tank we wanted to incorporate in an external fenceline, and some trees and power line that were far enough away to not be a big consideration. The final feature was the property line that made the southern boundary of the corrals.

the first step is to get familiar with the site you’re designing on. Decide what can be moved, and what you want to save.

After modeling up the site features, we can figure out where some of the major corral features go. The loading chute needs to go in a certain place so that trucks can be pointed down the road after they are loaded. The working chute has to be under the little pole barn. I decided to face the working chute south so that I’d have more room for sorting pens.

After the working chute nd loading chute are in their required positions, the rest of the corral kind of falls into place.

After those items are in place, the rest of the corral is just kind of connecting the parts together. The holding pens radiate out from the sorting gates. The main holding alley connects the sorting gates to the 2 bud boxes and has gates on the side to allow easy movement from the holding pens. The holding pens all have extra gates to allow easy movement between pen and alley.

Some other features we worked in were to reuse the existing water point, thus saving some plumbing work.

We also made the chute open to the side. By this I mean you have direct access to the chute from the outside, this lets you back your pickup right up to the chute instead of having to carry tools thru gates to the chute. This is a feature I try to work in on every chute that I can. I really like being able to have easy access to the chute. This also lets you add a building much easier later on corrals.

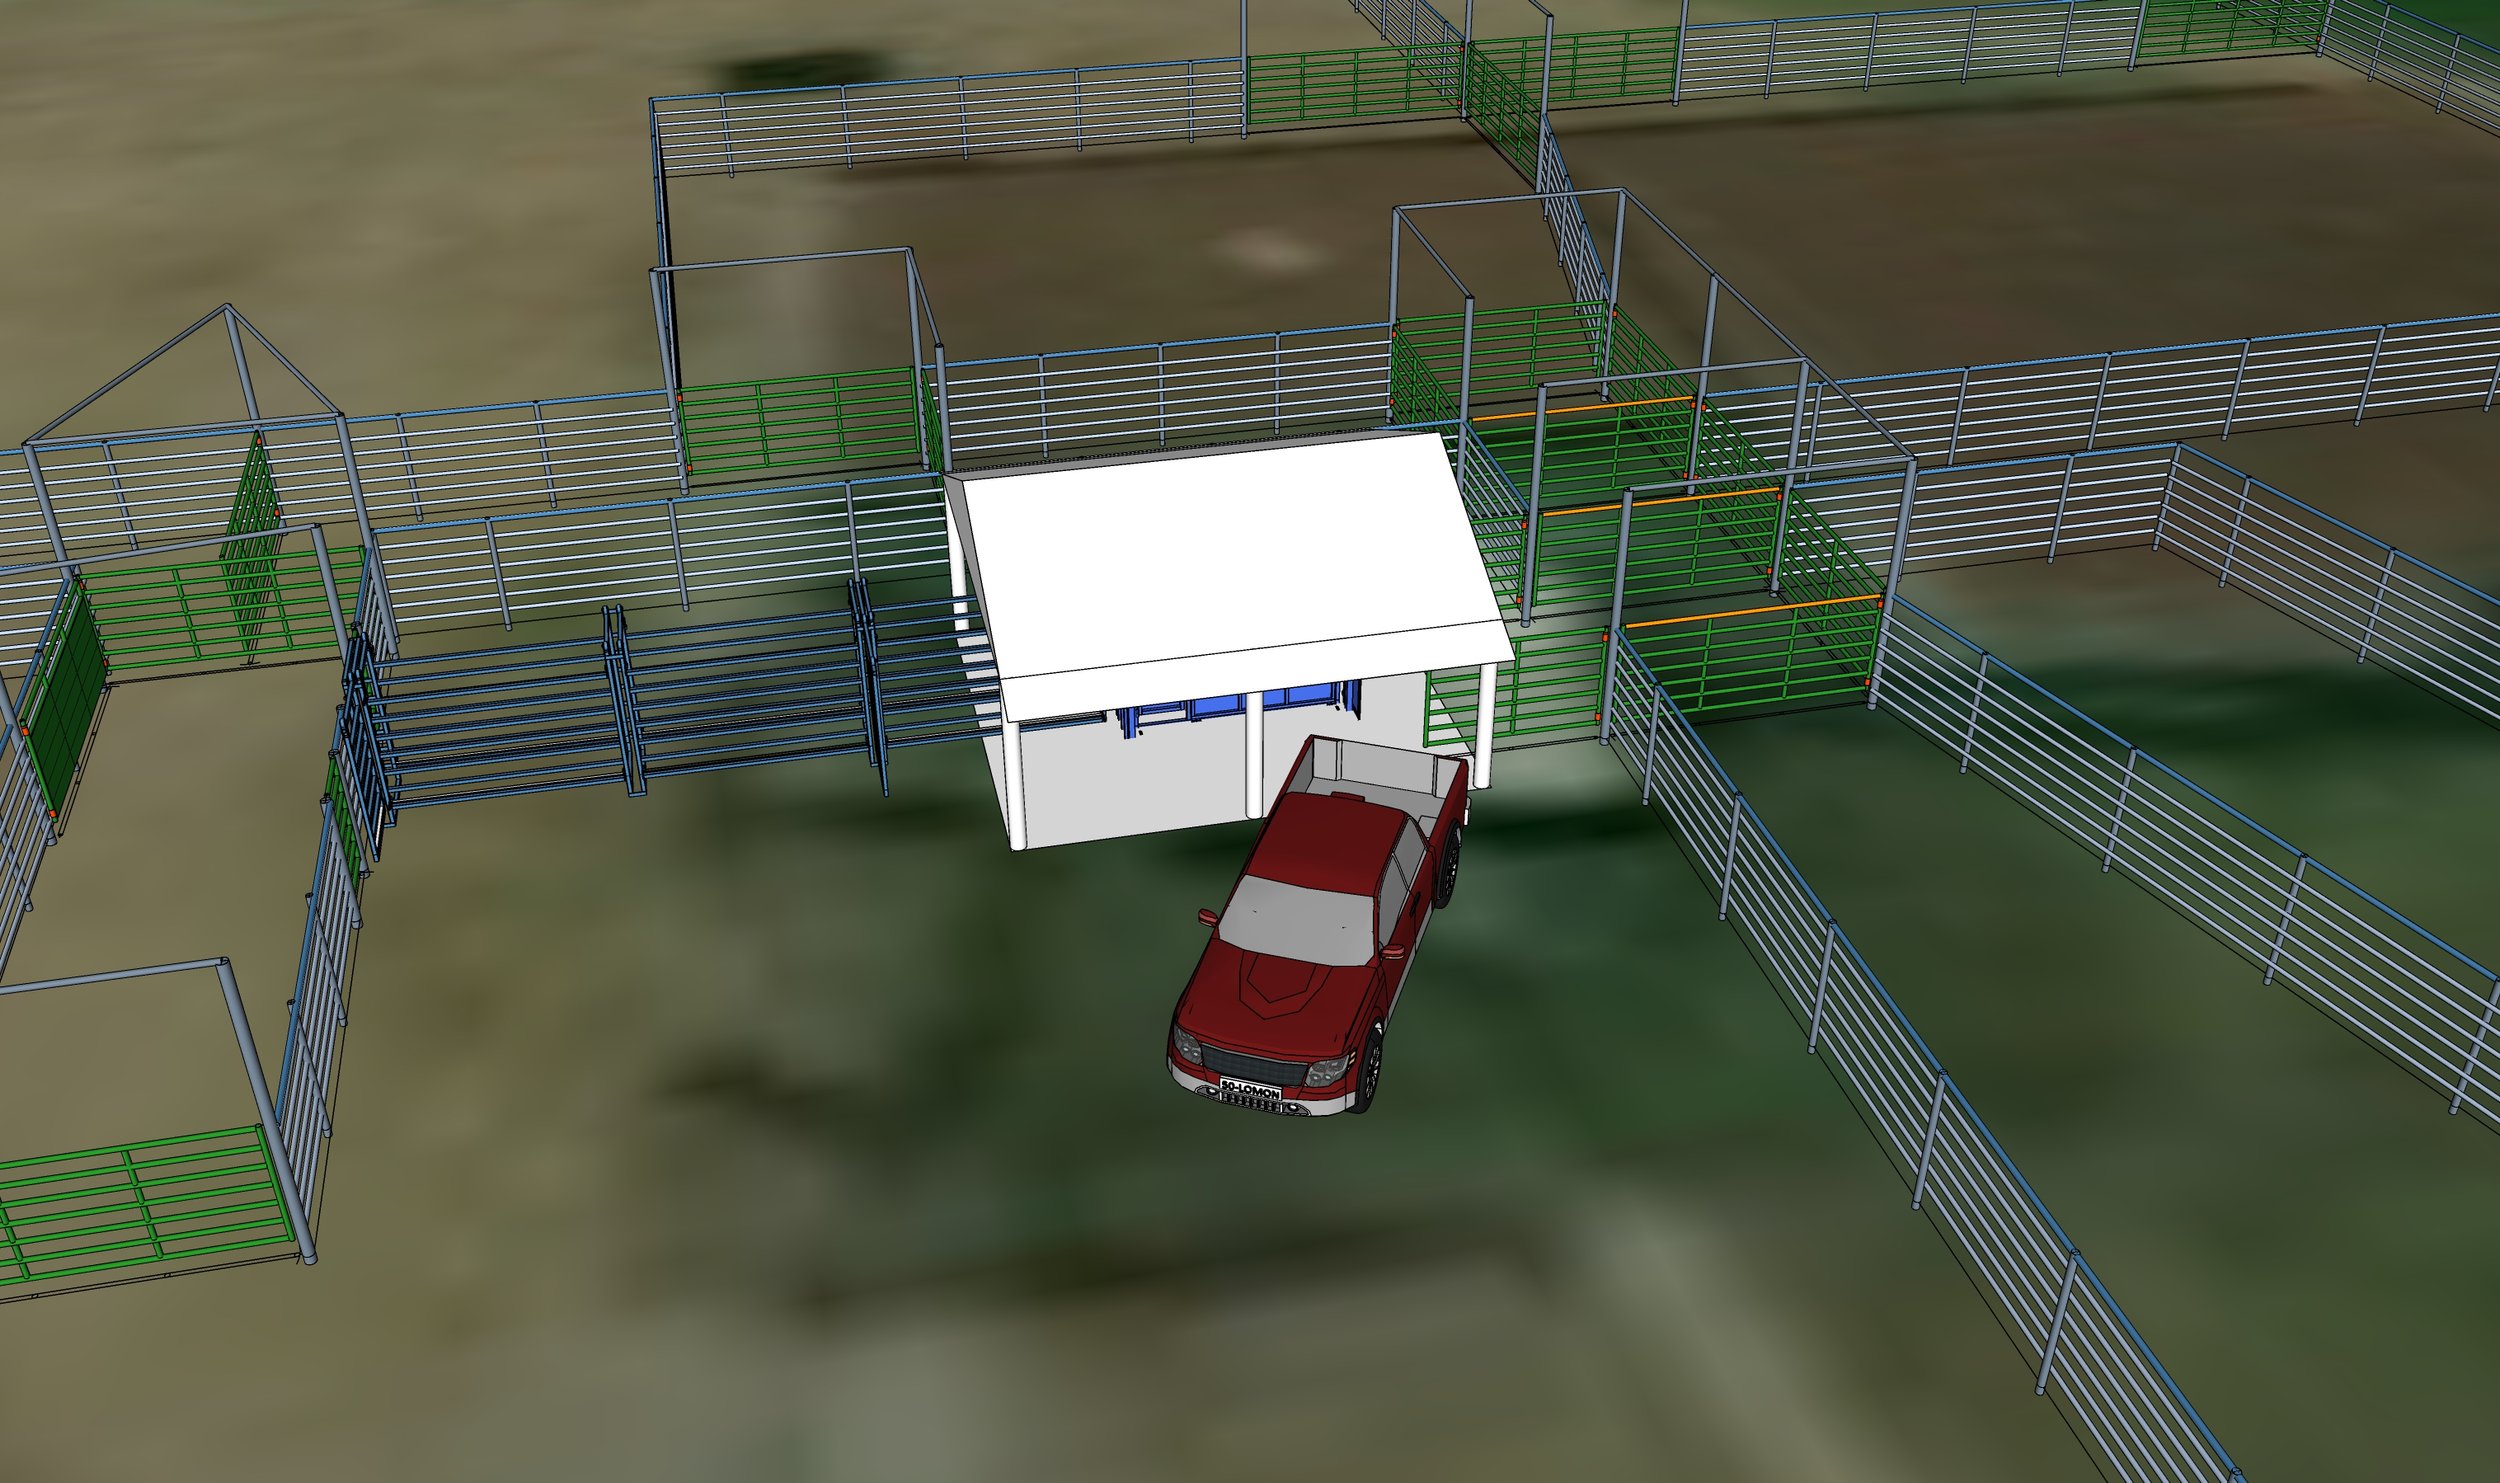
I like being able to access the working chute without going thru any gates.

The final deliverable for a project like this is the 3d model which we did all the design work in, then a dozen or so 2d drawings giving the dimensions of all the pens and showing where things go. Finally, a bill of material that you can use for budgeting and ordering materials.

I hope you’ve found this interesting. If you would like to learn more, feel free to contact me here thru this site.

Fully designed set of corrals

Hydraulic sorting gates, Part 5a: Cylinders

The cylinders and, occasionally, motors, are where the rubber hits the road in a hydraulic gate system. Choosing the right size and mounting them up correctly will make your system work well or break your stuff. In this post we will go over the different options for cylinders and also talk little bit about motors.

Hydraulic cylinder

The most common way to move the gate is with a cylinder. As we discussed in the post on the power source, a 1.5” cylinder is enough to move most gates. As for length, 12” to 16” is most common and it depends more on how the geometry of mounting the gates is looking, how far does it need to swing, and how are you going to mount the cylinder. The Surplus Center 9-4410-xx cylinder series works really well

One of the important things with mounting up hydraulic cylinders on gates is that you want to have a strong enough gate for it. You need strong hinges (I like sleeves over a round end of the gate on all gates). You also need a strong frame to the gate. I like to use a gate that has sch 40 pipe for the top rail when I know that the gate will be hydraulic. 14 gauge is too light and the tubes can break.

The next thing is to have mounts that are strong and also allow you to remove the gate relatively easily. This design works good for this series of cylinder. It spreads the load out along the gate, making it less likely to break off, and it also gives you an easy way to pin the cylinders in place. This lets you remove the cylinder to open the gate is your hydraulic system breaks down.

When you’re mounting the cylinder, use some vise grips to mount the brackets on your gate and post, then try it a few times. you want the cylinder to move the gate it’s full range of motion without hitting the end of the stroke, you want it to tighten up a little bit, that will keep it from stressing the mounts too much and also make it quieter when open or closed.

This mounting bracket is set thru a hole in the side of the post. This is very strong, but takes a lot of work and you don’t have a lot of room to adjust the angle.

This mounting bracket is set thru a hole in the side of the post. This is very strong, but takes a lot of work and you don’t have a lot of room to adjust the angle.

The last thing to talk about is the bracing. There’s 2 ways I have done this. the first is to weld the pipe onto the side of the post, then run a brace back along the fence, either to the next post or to the heavy top rail. A picture of this system can be seen on the top of the page.

The other way is to blow a hole in the post, then stick the mounting tube thru the post and weld it that way. This is a far stronger system than just welding it to the side, so you don’t need to brace it back. When you do this system, I’d recommend using a heavy wall tube, 3/16” instead of 1/8” that you can use on the first system.

Finally, weld everything up and grind it off nice. These mounts are often at a height that a person or horse can hit them if you’re not careful, so clean it up nice and if you’re walking by it all the time, put some foam or rubber padding around the sharp end!

I’ll make a separate part on using hydraulic motors for driving gates as there’s a lot to cover on that, so stay tuned!